Diverting Rain Water
It’s rainy season here in Santa Cruz. So far we’ve had 14 days of rain this month (December). November had 9 days of rain and October had 6 days of rain. Ever since we learned that there is evidence of high water pooled under the house (from home inspection we did during escrow) we’ve been thinking about mitigating the impact from the winter rain on the house. Excessive moisture fuel mold growth and wet wood will compromise the integrity of the structure. So, we want to divert the rain water away from the house.
A while ago we talked to Robert, prior owner of the house, and he mentioned that there is a drainage tube that was placed parallel between the house and the driveway to divert the pooled water in the back of the yard towards the street into the storm drain. This drainage tube is now covered up in grass and hardly visible. We don’t intend to use this if we can help it. Why? Because (a) Rainwater could be harvested and used to water the plants on the property; and (b) Large volume of rainwater discharging in to the storm drain cause problems such as erosion and degraded wildlife habitat. Allow me to digress on this second point.
Have you seen a label next to the storm drain? It may say, “No Dumping Flows to Bay,” or a variation of this message. This means that the liquid that goes into the storm drain does not get treated at sewage treatment plants. The storm drain water simply goes into a local watershed, transporting whatever it picks up along the way to the stream, ocean, etc. OK, that’s not big news and we’re not dumping automobile engine oil in the storm drain. Still, there are indirect ways that we may be contributing to the water pollution. Maybe it’s the fertilizer to keep the grass green or the pesticide used to kill weeds. Perhaps it’s the bitumen or asphalt on our roof that is slowly degrading in the sun and transported by the rain. We want to minimize these pollutants from getting into our watershed and also avoid erosion from high volume of storm water moving quickly through the system. All right, enough of my rant about avoiding directing rain water into storm drain and back to the house…
We also talked to our neighbor about rain water and “flooding” in the backyard during storms. In the past few years they have done a major renovation to their home by removing several feet of soil from their crawlspace and converting the crawlspace into a beautiful basement that opens out to the backyard. During their project they found that the soil has high clay content that does not drain well and found the water table to be high.
Next, went on a quest for water table data. First, we tried the water department with the city of Santa Cruz. They pointed us to the public works department. The people at the public works department was friendly and helpful, but they didn’t have water table data. One of the engineers mentioned that ordering a soils report from a soils professional would be the way to get complete analysis and it would be very expensive. A low cost alternative would be to simply dig a hole of 3-6 feet in the backyard and see if we hit water. So that’s what we did.
About a month ago Kurt dug a hole of about 8 inches in diameter using a post hole digger — one in the back yard and one in the front yard to see if the water table is high as the rumor has it to be. It was. It was a clear day and the soil dug up was still moist from the rain over the weekend. He stopped digging after 30 inches or so. Observing that the dirt at the bottom was visible he walked away. Then 30 minutes later he looked in the hole and saw 2 inches of standing water at the bottom!
What to do with this? We have a crawlspace that potentially floods. The soil in our area has high clay content and does not drain well. The water table is high in our area. We want to avoid sending rain water down the storm drain. Hmm….
Since our first priority is to “protect the house” we took a temporary measure to divert the rainwater from the downspout away from the foundation of the house. We will keep these downspout extension tubes in place until spring.

We plan to include a landscape designer as part of the overall design team so that rainwater harvesting system can be integrated into the overall design. Right now we are thinking of putting rain pillows under the deck on the south side of the house. Eventually the yard will be covered with mulch that will absorb rainwater and native plants that require little or no watering (once established). The timing of actual implementation of the landscaping design will be after the house completion.
By the way, there is a great free resource for rainwater management for single family homes called, “Watershed Stewardship Toolkit,” prepared by Coastal Watershed Council. It’s an easy to read document with specific examples for the things we are considering, such as rain pillows or cisterns, vegetated swales or rain garden, soil amendments and more. This document is available from CWC’s stewardship page on their website.
Solar Access and Shading
Another good resource we learned about is the Tools Lending Library at Pacific Energy Center. This is another free program provided by our local utility, PG&E. Just as you would borrow books from the public library, we filled out the online request form to borrow tools from PG&E’s tools library. Nice, isn’t?
Since we needed to get “shading analysis” for the 4 sides of the house to be used for the passive house calculation we looked for “Shading/Solar Access” types of tools in the lending library. The search returned 7 results and we selected to borrow the SunEye by Solmetric.

The SunEye comes with the hand-held electronic device, power cable, USB cable, PC (not Mac) software and a manual in the case. We also borrowed a Windows PC from Kurt’s brother because the companion software only runs on Windows machine and not on Macintosh — we only have Macs at home. It took us a few tries to get the picture and the data in the form that was useful for our passive house consultant, Graham. We found the user interface of the tool to be good once you get the hang of it by taking a few pictures. I think the hardest part of the data transfer to the PC was getting the cable to plugged in correctly to the hand held device. The hand-held side of the USB cable did not have an obvious “this way up” marker so you could easily plug it in the wrong way. Once the data was transferred from the hand held to the PC a report can be generated and extracted for emailing.
Since the data from this tool is most often used for determining the optimal placement for solar panels the instructions in the manual directs the user to be facing south when taking pictures. We actually had to stand with our backs to the wall to get the pictures we wanted. Here’s what we did to take the pictures at each of the sides of the house:
1. After powering on the device, press the sun icon on the lower left hand corner
2. Press Session button and choose New in the selection window
3. Enter data such as the session name, notes and location information
4. Press sun icon
5. Press Skyline then choose New in the selection window
6. Enter panel tilt (we entered 25 degrees) and press OK
7. Then, standing with our back to the wall, we looked in the camera image on the screen to make sure that the sun path clears the roof overhang and stood very still to make sure that the camera was level (using the built in level) and pressed snap to take the picture.
Starting at the south (back) side of the house we took the snaps. Each time I ducked away from the fish-eye lense to make sure I was not in the picture. We repeated steps 4 – 7 for each side of the house. This is what the pictures looked like:
East side of the house shows lots of shading (in green) from trees. Yellow color represents sun.

South side of the house receives lots of sun.

After Kurt took the pictures he stood still while I measured the distance from the wall to the fish-eye lens. We took 2 pictures on the west and north sides of the house because they have protrusions. (e.g. the porch sticks out from the front of the house) Here are the measurements:
South: 49 inches
West 1: 42 inches
West 2: 60 inches
North 1: 52 inches
North 2: 50 inches (from the bottom step of the porch)
East: 52 inches
We used the post-processing software to correct the tilt angle to 90 degrees to reflect the shading to the vertical walls.
Appliances and Kitchen Design
One of the things we learned on Friday was that appliances consume the largest portion of the electrical usage in large homes. The pie chart based on “PG&E Survey 2009” showed that appliances consume 28%, pool 24%, HVAC (heating and cooling) 16%, lighting 15%, electronics 9% and miscellaneous 8%. Well, we don’t have a large home, we don’t have a pool and our passive house design will greatly reduce heating needs. Still, getting energy efficient appliances is a priority for us since we do need new appliances and the energy efficient ones have various rebates and tax credits.
Another thing that I learned (that Kurt already knew) was that 2/3 of electricity generation in U.S. is wasted. Of the 40.67 quadrillion BTU energy consumed to generate electricity only 13.21 quadrillion BTU, or 32%, is delivered for end use. Again, this means 68% is wasted. Isn’t it amazing? This source is from U.S. Electricity Generation 2008 chart from Energy Information Administration’s Annual Energy Review 2008. These charts were part of the workbook material used in the “Integrating Energy Efficiency and Renewables in Home Retrofits” class offered by PG&E. Another free class offered to the public by PG&E. To search through their class offering please visit here.
So combining these 2 pieces of information we conclude that paying attention to the energy performance of our home appliances will not only save us money on our utility bill it also can lower our carbon footprint by reducing the demand on energy generation. Saving money and saving the planet is a win-win formula.
OK, so we will be replacing old appliances with energy efficient ones. But which brand and model?
We started our appliance research by visiting the Miele Gallery in San Francisco. Why Miele? Because that’s what Flora recommended. Our friend, Flora, is an artist that happens to be a terrific cook and has a beautiful kitchen. She shared with us her experience of various home remodels (about 6 previous residences) she had done and one of the things she mentioned was to go to the kitchen gallery at the design center in San Francisco and take their classes.
On Saturday we went to the kitchen design class at the Miele Gallery. A nice light breakfast was served before the class and Kurt got to ask questions to his heart’s content as 3 presenters covered different topics. First, Ruth did a nice job of covering the highlights of kitchen design. Then Rebecca covered the details of Miele appliances. (She opened our eyes to the steam oven!) We will be taking the master chef class at Miele in a week to learn more about this and other appliances. Then Maureen showed examples of tiles and countertops and went into details of the different countertop materials. Again, this class was free!
Later we went to an appliance store in San Francisco and learned about a showroom in Brisbane that displays and hold classes for other brands such as Sub-Zero, Wolf, Thermador and Bosch. The search for appliances will continue….
Combined Hydronic Space and Water Heating
Today we spent all day at the Santa Cruz Police Station. Why? The nice large community room at the police department was where Pacific Gas and Electric Company (PG&E) held a public class titled, “Combined Hydronic Space and Water Heating for Homes.” Somehow we managed to register for this class that was targeted for experienced HVAC/mechanical contractors, and building performance consultants. I liked how the instructor, Rick Chitwood of Chitwood Energy Management, Inc., taught the class with just enough explanation for us homeowners to digest the information while succinctly answering the questions from experienced people in the room. Several people at class have taken other classes from Rick and reviewed him favorably and we definitely recommend his class.
This class offered by PG&E was open to the public and it’s *free*! PG&E provided catered breakfast and lunch. It was quite good too. To see a listing of other classes offered by PG&E please visit their energy efficiency class registration site.
Towards the end of the class we did a design exercise which really drove the point of source of heat loss. Each student did a simple heat loss calculation for an example house plan with 1116 s.f. of conditioned floor area with windows and doors shown. We did 6 simple heat loss calculation for ceiling, floor, walls, windows, door and air infiltration. When we completed our calculation Kurt and I looked at each other and said, “This is why passive house makes sense — most of the heat loss is caused by air infiltration (lack of air tightness) and by windows!”
Other take away points for me were
- Simpler is better because higher complexity triggers higher cost of installation and higher maintenance needs.
- Tankless water heater is not what we want because it takes a long time (20 seconds) for the water to get warm, thus wasting water and they can’t take the pre-heated water from solar thermal system because the modulated power burner can’t modulate to accommodate a smaller temperature difference.
- Huge opportunity for energy efficiency is on the table — Even in California (state with the strictest building code) one can achieve 50% reduction in energy consumption from a house that only adheres to title 24 by doing insulation effectively and further reduce the energy consumption by half by doing mechanical system effectively.
- Generally, heating systems are over-sized for California’s mild climate.
Tomorrow we go to another PG&E class titled, “Integrating Energy Efficiency and Renewables in Home Retrofits,” in San Mateo.
Glass and Windows
@font-face {
font-family: “Cambria”;
}p.MsoNormal, li.MsoNormal, div.MsoNormal { margin: 0in 0in 0.0001pt; font-size: 12pt; font-family: “Times New Roman”; }div.Section1 { page: Section1; }
You know, sometimes you have a piece of fact stored in your head but it doesn’t mean anything until you ask why. For example, I knew that “Glass used in windows contained lead a long time ago but today most don’t,” and “When you look at a sheet of glass from the side it looks green, like the ones at the display shelves at retail stores.” Okay, this is basic stuff that you’ve known and observed, right? Well, I got curious and started a dialog with my husband, Kurt, who is a photographer with physics background and has a gift of explaining science in a simple way. Our conversation today as we were driving went something like this:
@font-face {
font-family: “Cambria”;
}p.MsoNormal, li.MsoNormal, div.MsoNormal { margin: 0in 0in 0.0001pt; font-size: 12pt; font-family: “Times New Roman”; }div.Section1 { page: Section1; }
Chie: So, hon, I’m curious.
Kurt: Curious about what?
Chie: Well, I know that lead was taken out of glass because it’s dangerous. But why did they have it in the first place?
Kurt: You know that glass is made out of sand, right?
Chie: Yeah…
Kurt: Those tiny quartz pieces, sand, melt at a very high temperature. By introducing another material into the sand it can melt at a lower temperature.
Chie: Oh, OK, so they used lead in glass for manufacturing efficiency.
Kurt: Right. Not only was it efficient it was also good for light. Lead will let light through the glass without affecting the colors.
Chie: Really?
Kurt: Yep. When you look through the windows at our craftsman home you’ll see the colors in a natural state. Lead is pretty nice for letting true colors through.
Chie: Hmm… So what do they use in glass now?
Kurt: Mostly soda-lime. It has a greenish tint. It looks green because the materials block red from coming through. You may notice when you look through windows that people look a bit greener and less bright.
Chie: Why less bright?
Kurt: Because with every air-to-glass contact you lose approximately 5% of light.
Chie: Really? How do you know that?
Kurt: I know it from studying physics.
Chie: So, if there is 5% degradation of light for each air-to-glass contact then for double-paned windows it loses 20% of brightness and for triple-paned windows you lose 30%?
Kurt: Yes, approximately.
Chie: Wow. You know what? I noticed those demo windows we saw had a gray tinge to them. When we get triple paned windows with additional coating to them the house will look darker, right? I wonder if part of the “happy feeling” we get at the house is from the single pane, lead windows letting in bright natural light?
Kurt: Hmmm…..
Later at home I brought up this topic of light going through glass losing brightness and Kurt decided to do a demonstration for me. He grabbed one of his light meters he uses for photography and measured the brightness of the kitchen. It was about 64. Then he took 3 sheets of thin glass used for his 6×7 slide mounts and stacked them above the light meter so that there is air-glass-air-glass-air-glass-air, which would yield 30% less brightness. The light reading dipped to about 45, which is 30% less than 64. What a fun science experiment in the kitchen!

@font-face {
font-family: “Cambria”;
}p.MsoNormal, li.MsoNormal, div.MsoNormal { margin: 0in 0in 0.0001pt; font-size: 12pt; font-family: “Times New Roman”; }a:link, span.MsoHyperlink { color: blue; text-decoration: underline; }a:visited, span.MsoHyperlinkFollowed { color: purple; text-decoration: underline; }div.Section1 { page: Section1; }
Now, switching gears to windows. As you know, we are striving for passive house certification and windows are very important for the energy performance of the house as well as the thermal comfort for occupants. Have you noticed how much colder it feels to stand next to a window than standing next to an insulated wall on a cold night? This is because there is a heat transfer from inside of the house where it’s warm to outside of the house where it’s cold. With passive house windows there will be less heat escaping to the outside. The passive house windows specification is quite detailed and only few windows manufacturers in the US provide passive house windows. In Europe today there are over 50 manufacturers, mostly small to medium businesses, offer passive house windows. To find out more about passive house window requirements please visit the window requirement page on passipedia.
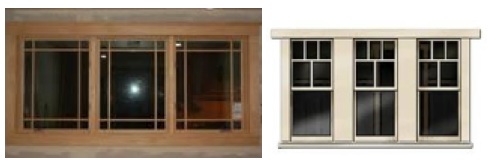
From aesthetics standpoint we want our windows to have the arts and crafts look and feel with muntins. So what are muntins? They are those strips, wood or metal, that separates panes of glass. With the windows requirements for passive house it’s not feasible to have windows with true muntins where there are separate glass pieces fitted into the muntins. The look can be achieved by pasting a strip (wood or other material) on the outside pane and on the inside pane. We wanted to see what that looks like so we visited the corporate office of Serious Materials in Sunnyvale to see a demo window unit with muntins. When we looked closely it appears to have a “shadow” around the muntin but we were told that this is not noticeable if you simply look from a drive-by distance from the house. (I forgot to take a picture of this today.)
Here are some examples of craftsman style muntins –
@font-face {
font-family: “Cambria”;
}p.MsoNormal, li.MsoNormal, div.MsoNormal { margin: 0in 0in 0.0001pt; font-size: 12pt; font-family: “Times New Roman”; }p.MsoListParagraph, li.MsoListParagraph, div.MsoListParagraph { margin: 0in 0in 0.0001pt 0.5in; font-size: 12pt; font-family: “Times New Roman”; }p.MsoListParagraphCxSpFirst, li.MsoListParagraphCxSpFirst, div.MsoListParagraphCxSpFirst { margin: 0in 0in 0.0001pt 0.5in; font-size: 12pt; font-family: “Times New Roman”; }p.MsoListParagraphCxSpMiddle, li.MsoListParagraphCxSpMiddle, div.MsoListParagraphCxSpMiddle { margin: 0in 0in 0.0001pt 0.5in; font-size: 12pt; font-family: “Times New Roman”; }p.MsoListParagraphCxSpLast, li.MsoListParagraphCxSpLast, div.MsoListParagraphCxSpLast { margin: 0in 0in 0.0001pt 0.5in; font-size: 12pt; font-family: “Times New Roman”; }div.Section1 { page: Section1; }ol { margin-bottom: 0in; }ul { margin-bottom: 0in; }
Since windows are the most expensive line item in the bill of material and have a significant impact on the performance of the house we are paying special attention.
Bottom line, we want windows that
1. Are passive house compliant for energy efficiency
2. Provides nice day lighting with maximum brightness and minimal color distortion
3. Have the arts and crafts cottage look that is congruent with craftsman architecture
Oh, we want to do all of the above without breaking the bank!